

Today we're going to start with a new song.In the next video you will listen and sing this beautiful song because next Sunday is a really special day: Mother's Day!!! So next Sunday I want you singing this song to your moms.
Hoy vamos a empezar con una canción nueva. En el vídeo podrás escuchar y cantar esta canción tan bonita porque el domingo que viene es un día muy especial: ¡Es el día de la madre! Así que el próximo domingo os quiero cantando esta canción a vuestras mamis.

Recuerda que solo debes aprenderte el estribillo
Here you can practice the chorus and learn it.
Aquí podrás practicar el estribillo y aprendértelo
MOTHER'S DAY CRAFT
What you will need:

• 1 sheet of coloured A4 card
• 1 sheet of yellow A4 paper
• Card – old cereal box
• 2 straws
• A round template – jar lid
• Pencil
• Marker pen
• Ruler
• Scissors
• Glue
• Cellotape
• 1 sheet of yellow A4 paper
• Card – old cereal box
• 2 straws
• A round template – jar lid
• Pencil
• Marker pen
• Ruler
• Scissors
• Glue
• Cellotape
1 folio de color tamaño A4 o cartulina
• 1folio de color amarillo tamaño A4
• Cartón – caja de cereales, zapatos,etc
• 2 pajitas
• Una plantilla redonda – tapón o tapadera de algún tarro
• lápiz
• rotulador
• regla
• tijeras
• pegamento
• Cinta adhesiva
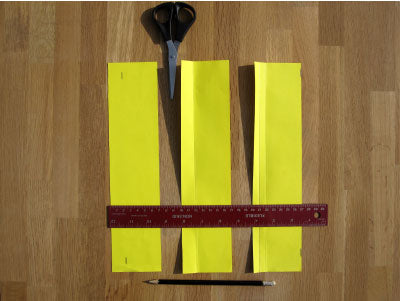
Step 1:
For the sunflower heads. Place the paper in portrait position. Measure in 7cm from the left at the top and bottom, mark with a pencil and join your marks with a ruler.
Para las cabezas de girasol. Pon el papel en posición de retrato(vertical). Mide 7cm desde la izquierda en la parte superior e inferior, marca con un lápiz y junta sus marcas con una regla

Step 2:
Repeat step 1, and cut along the lines dividing the sheet into three.
Repite el paso 1 y corta las tiras dividiendo el folio en tres partes.
Step 3:
Take your first strip and measure in 2cm from the left. Mark at the top and bottom and join the marks with a ruler. Fold along this line and then fold the smaller side in half.
Coge la primera tira y mide 2cm desde la izquierda.marca arriba y abajo y une las marcas con al regla.Dobla la linea y después la parte doblada( la más fina) dóblala otra vez.
Repeat step 3 on the other two strips.
Repite el paso 3 en las otras tres tiras.
Step 4:

Use scissors to (carefully!) make cuts to the first fold, roughly 1cm apart. Make sure not to cut beyond the fold.
Usa las tijeras para hacer cortes al primer pliegue aproximadamente de 1 cm de separación.asegúrate de no cortar mas allá del pliegue.
Step 5:
Turn strip around and make cuts to the second fold, again, roughly 1cm apart. Making sure not to cut beyond the fold.
Dale la vuelta a la tira y haz cortes en el segundo pliegue, de nuevo, con una separación de aproximadamente 1 cm. Asegurándote de no cortar más allá del pliegue.
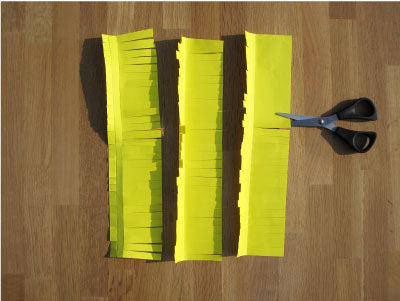
Repeat steps 4 and 5 on the other two strips.
Repite los pasos 4 y 5 con las otras dos tiras.
Step 6:
Fold each strip in half lengthways and wrap paper around in a circle securing with cellotape. Fold both the smaller and longer flaps flat out to create the petals.
Dobla cada tira por la mitad a lo largo y envuelve el papel en un círculo asegurándolo con cinta de celofán. Dobla las solapas más pequeñas y las más largas a lo largo para crear los pétalos

Step 7:
To make the sunflower centres. Place jar lid on card and draw around it with a pencil, write the message in with a marker pen and cut out.
Para hacer los centros de girasoles. Coloca la tapa del frasco sobre la tarjeta y dibuja a su alrededor con un lápiz, escribe el mensaje con un rotulador y recorta.
Repeat twice more.
Repite dos veces

Step 8:
To make the sunflower stems. Carefully cut one of the straws in half.
Para hacer los tallos de los girasoles. Corta con cuidado una de las pajitas por la mitad.
Step 9:
To make the vase, draw a vase shape in pencil on the card, and once you are happy with the shape, trace over with the marker pen and cut out (colour in if you wish!).
Para hacer el jarrón, dibuja la forma de un jarrón en lápiz en el trozo de cartón, y una vez que estés contento con la forma, traza con el rotulador y córtalo (¡coloréalo si quieres!).

Step 10:
Arranging the sunflowers. Place the flower heads at the top of your sheet of card. Arrange the straws underneath; use the longest straw for the top flower and shorter straws for the lower flowers. Place the vase at the base of the stems (covering the bottoms).
Para crear los girasoles. Coloca las cabezas de las flores en la parte superior de tu folio de color o cartulina. Coloca las pajitas debajo; usa la más larga para la flor superior y las más cortas para las inferiores. Coloca el jarrón en la base de los tallos (cubriendo la parte inferior).
Step 11:
Sticking everything down. First use cellotape to attach the straws, place at the top and bottom so the flower heads and vase cover the cellotape. Next using the shorter flaps, glue the flower heads down onto the card. Glue the vase on top of the stems at the bottom of the page. Finally glue the flower centres on top of the flower heads, et voila!
Pégalo todo. Primero usa cinta de celofán para pegar las pajitas, colócalas arriba y abajo para que las cabezas de las flores y el florero cubran la cinta de celofán. Luego, usando las solapas más cortas, pega las cabezas de las flores en la tarjeta. Pega el jarrón sobre los tallos en la parte inferior de la página. Por último, pega los centros de las flores /(los círculos con mensaje) sobre los pétalos, y ¡voilà!

Please, take a photo of your sunflowers and send it to me!!
Por favor, haz una foto de tus girasoles y envíamela!

NO OLVIDES MIENTRAS LE DAS ESTE REGALO TAN BONITO CANTARLE LA CANCIÓN " YOU ARE MY SUNSHINE" Y DARLE UN ABRAZO ENORME!!!!

No comments:
Post a Comment